
The primary cause of chunked or thinned wedge shots is a mismatch between your club’s geometry (bounce and grind) and the turf, not just poor technique.
- Bounce is the angle of the sole that prevents the leading edge from digging; it’s designed to “skid” or “thump” the turf.
- Grind is the shaping of the sole that modifies how the bounce interacts with the ground, especially when you open the clubface.
Recommendation: Instead of fearing bounce, learn to use it. Select a wedge with enough bounce for your typical course conditions and a grind that matches your shot-making style to achieve consistent, crisp contact.
For the amateur golfer, no part of the game inspires more frustration than the short game. You stand over a simple pitch, only to see the leading edge of your wedge dig into the soft turf, sending a clump of dirt farther than the ball. Or, on a firm, sun-baked fairway, the club bounces off the hardpan, catching the ball’s equator and sending it screaming over the green. These are not just signs of a bad swing; they are symptoms of a fundamental misunderstanding of your equipment. Many players believe the solution lies in more practice or a new swing thought, but often the problem is already in your hands.
The common advice is to get a set of wedges with standard lofts and learn to hit them. We are told about the different types—Pitching, Gap, Sand, Lob—but the conversation often stops there. The true genius of wedge design, and the key to unlocking a consistent short game, lies in the subtle but powerful geometry of the club’s sole: its bounce and its grind. These elements are not just for tour professionals; they are the solution for the amateur player struggling with inconsistent contact.
This guide will move beyond the basics of loft. We will explore the physics of turf interaction, demystifying how a wedge’s design is meant to work with the ground, not against it. You will learn why “using the bounce” is not just a catchy phrase but the single most important concept to prevent digging. We will break down how different sole grinds enable or restrict your ability to hit creative shots. By understanding your wedge as a precision tool, you can finally select the right one for your swing and your course, turning your greatest weakness into a reliable strength.
This article provides an in-depth look at the key technologies and concepts that define modern wedges. The following summary outlines the journey from understanding loft gaps to mastering the art of trajectory control, empowering you to make informed decisions about the tools in your bag.
Summary: How to Choose the Right Wedge for Your Course Conditions
- The Pitching Wedge Gap: Do You Need a 50-Degree Wedge in Your Bag?
- 60-Degree Wedge: Why High Handicappers Should Leave It Out of the Bag?
- Raw vs Chrome: Does a Rusty Wedge Really Generate More Spin?
- C-Grind vs S-Grind: Which Sole Shape Allows You to Open the Face?
- Micro-Grooves: How Face Texture Improvements Help in Wet Conditions?
- Thump the Turf: How to Use Bounce to Prevent Digging on Pitches?
- Why the High Lob Shot Is a Fatal Mistake on Firm Links Turf?
- One Wedge, Three Shots: How to Manipulate Trajectory Around the Green?
The Pitching Wedge Gap: Do You Need a 50-Degree Wedge in Your Bag?
The question of needing a 50-degree wedge is fundamentally a question of distance gapping. Modern iron sets are built with increasingly strong lofts, meaning your pitching wedge (PW) might be as low as 43 or 44 degrees, while your sand wedge (SW) is traditionally around 56 degrees. This creates a significant 12-14 degree gap, which can translate to a 25-30 yard difference in distance—a void too large to manage with technique alone. A 50-degree gap wedge is designed specifically to fill this void, providing a full-swing option between your PW and SW.
For recreational players, this “in-between” yardage is a common point of failure. You’re forced to either take a hard swing with a sand wedge or a delicate, decelerating half-swing with a pitching wedge—both are low-percentage shots. The 50-degree wedge, often referred to as a gap wedge (GW) or an approach wedge (AW), provides a full-swing club for that critical scoring zone. Data shows that for amateur golfers, the full-swing distance with a gap wedge can fall anywhere in the range of 79 to 126 yards, depending on their skill and swing speed. Having a dedicated club for this distance eliminates guesswork and promotes a more aggressive, confident swing.
So, do you need one? If you frequently find yourself between 80 and 110 yards from the green and struggle to control your distance, the answer is unequivocally yes. It simplifies shot selection and allows you to build a more consistent and repeatable swing for each distance, rather than trying to manufacture shots. A dedicated gap wedge is one of the easiest ways to improve your scoring from full-shot approach distances.
60-Degree Wedge: Why High Handicappers Should Leave It Out of the Bag?
For high-handicap golfers, the 60-degree lob wedge often represents more of a liability than an asset. While it’s capable of producing spectacular, high-arcing shots that stop on a dime, it is by far the least forgiving club in the bag. Its high loft and typically lower bounce require an exceptionally precise strike to execute correctly. For a player who doesn’t practice consistently, the most common results are either a bladed shot that screams across the green or a chunked shot that goes nowhere, often from digging the sharp leading edge.
This isn’t just anecdotal; it’s a view shared by top instructors. As legendary coach Butch Harmon states, the margin for error is simply too small for most amateurs.
The average player shouldn’t use anything above 58 degrees.
– Butch Harmon, Out of Bounds Golf wedge analysis
The underlying design of the lob wedge demands a perfect storm of a good lie, confident technique, and precise contact. For players still developing consistency, a much safer and more effective approach is to use a club with less loft, such as a 56-degree sand wedge, and learn to play different shots with it. A bump-and-run with a pitching wedge or even an 8-iron will produce a far more predictable outcome than a poorly executed flop shot.
Case Study: The High-Handicapper’s Dilemma
An analysis by Performance Golf confirmed this. Their study showed that high-handicappers achieved significantly better scoring results when they limited their highest loft to 56 degrees. By opting for a lower-lofted club and using a simpler, putting-style chipping stroke, players prioritized consistency over flair. The research concluded that for golfers in the mid to high-handicap range, the risk associated with lob wedges far outweighs the potential reward, and focusing on reliable, repeatable shots with more forgiving clubs is the fastest path to lower scores.
Raw vs Chrome: Does a Rusty Wedge Really Generate More Spin?
The debate over whether a rusty wedge generates more spin is one of golf’s most enduring myths. The theory is that the raw, rusted surface creates more friction against the golf ball’s cover, imparting higher spin rates. However, in dry conditions, this theory doesn’t hold up to scientific testing. The primary generator of spin is not the clubface’s finish but the sharpness and geometry of its grooves. A robot test conducted for Golf.com using a non-plated raw wedge and a chrome-plated wedge found the spin rates to be nearly identical, with a statistically insignificant difference of only 45 RPMs. The real difference with raw wedges is a slightly softer feel at impact and faster wear on the groove edges, as there is no chrome layer to protect the underlying steel.
However, the story changes dramatically in wet conditions. This is where the true benefit of a raw finish becomes apparent. A chrome finish, being less coarse, allows a layer of water to get between the clubface and the ball, which significantly reduces friction—and thus, spin. A raw, un-plated surface helps to channel water away more effectively and maintain more of that crucial friction. In fact, TaylorMade’s testing revealed that raw wedges might only lose 25% of their spin in wet conditions, whereas a chrome-plated wedge can lose as much as 50%.
This shows that the choice is not just cosmetic. While a rusty wedge won’t magically add spin on a sunny day, it offers a tangible performance advantage by retaining spin in morning dew, light rain, or on wet turf. It’s a choice about maintaining consistency across different playing conditions.
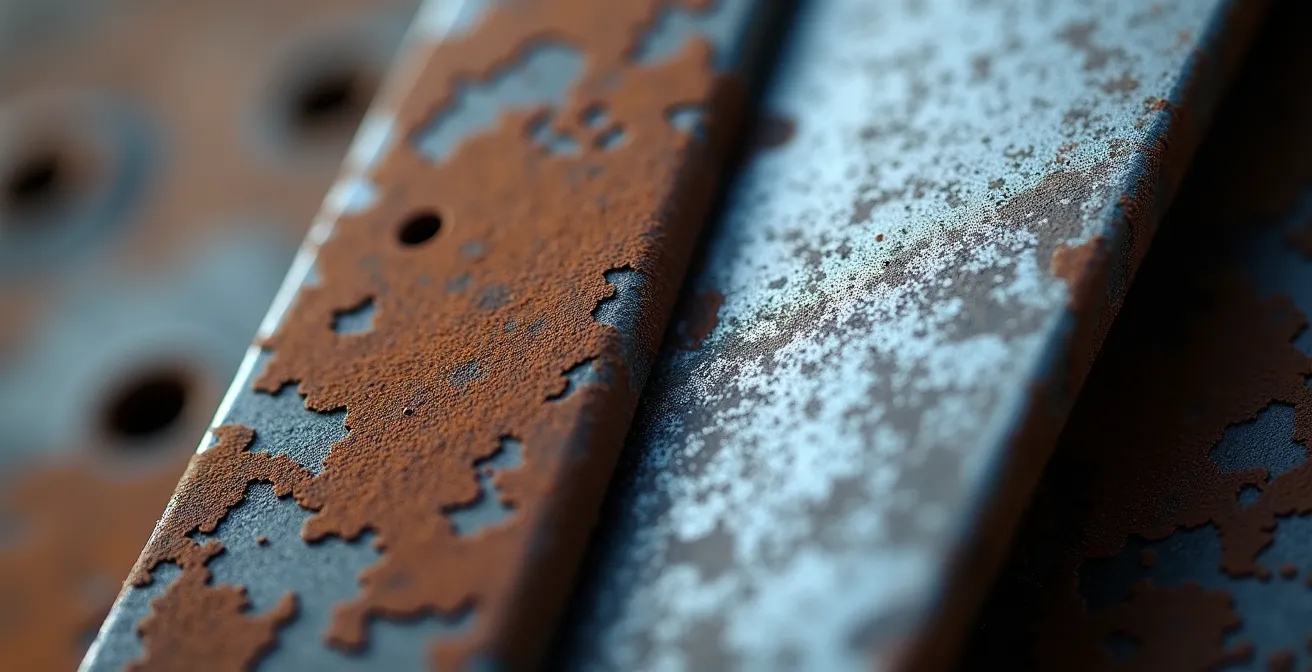
As the image above illustrates, the difference is in the micro-texture. The plating on a chrome wedge can slightly round the sharp edges of the grooves, whereas a raw wedge presents the precisely milled groove edge directly to the ball, which is a key factor in its performance, especially in the wet.
C-Grind vs S-Grind: Which Sole Shape Allows You to Open the Face?
Beyond loft and bounce, the ‘grind’ of a wedge is one of the most critical yet least understood features. A grind refers to the shaping of the sole of the club—material being removed from the heel, toe, or trailing edge. This shaping dictates how the wedge’s sole interacts with the turf. The two most common types are the S-Grind and the C-Grind, which offer distinctly different performance characteristics.
The S-Grind is the traditional, all-purpose option. It features a full sole with moderate width, making it effective for players who approach the ball with a square clubface. Its design provides consistent, predictable turf interaction on full shots and standard pitches. The “S” stands for “straight,” as it’s ideal for a straightforward style of play.
The C-Grind, by contrast, is for the artist. It features significant relief (material ground away) in the heel and toe, creating a “C” shape on the sole. This is the grind that allows a player to open the face for a flop shot without the leading edge rising too high off the ground. By removing material from the heel, the club can be laid open and still sit flush, allowing the golfer to slide the club under the ball. It is the ultimate tool for versatility and creative shot-making around the greens, particularly on firmer turf where precision is paramount.
This table from Vokey, a leader in wedge design, breaks down the key differences:
| Feature | C-Grind | S-Grind | Best Use Case |
|---|---|---|---|
| Heel/Toe Relief | Maximum relief | Moderate relief | C: Open-face shots |
| Versatility | High – multiple shot types | Moderate – square face | C: Creative short game |
| Bounce Engagement | Variable with face angle | Consistent | S: Predictable contact |
| Best Conditions | Firm turf, tight lies | All conditions | S: Bunkers, full shots |
| Player Type | Shot makers | Consistency seekers | C: Low handicap, S: All levels |
Your Action Plan: Self-Assessment Grind Test
- Go to a firm fairway lie with your current wedge and set up to hit a high, soft shot by opening the clubface.
- Check the leading edge’s position: if it sits high off the ground and you fear blading the shot, you need more heel/toe relief (C-Grind).
- Try the same open-faced shot from a greenside bunker. If you struggle to slide the club under the ball, the heel relief of a C-Grind will help.
- Now, test your square-faced shots. If you value predictable, consistent turf interaction above all, the S-Grind is your ideal match.
- Based on this feedback, identify whether you are a ‘shot maker’ who needs versatility (C-Grind) or a ‘consistency seeker’ who needs reliability (S-Grind).
Micro-Grooves: How Face Texture Improvements Help in Wet Conditions?
While the main U-shaped or V-shaped grooves are responsible for generating spin on full shots, modern wedge technology has introduced a secondary level of face texture: micro-grooves. These are extremely fine lines or patterns milled onto the flat areas of the face between the primary grooves. Their purpose isn’t to replace the main grooves but to supplement them, especially on the delicate, partial shots where the ball doesn’t fully compress.
The primary function of all grooves is to channel away debris and moisture from the impact area, allowing for cleaner contact and more friction between the face and the ball’s cover. Micro-grooves create additional tiny channels for this evacuation process. This is particularly effective in damp conditions like morning dew or light rain. On a delicate chip or pitch, where swing speed is low, the ball may only make contact with the face for a split second without compressing into the main grooves. In these instances, the micro-grooves provide the extra ‘grip’ needed to impart spin. The effect is significant; testing has shown that micro-grooves can preserve up to 2,000 RPM of spin that would otherwise be lost on partial shots in wet conditions.
The Cleveland CBX Full-Face wedge is a prime example of this technology in action. It combines larger main grooves (Tour Zip Grooves) with laser-etched micro-grooves (UltiZip) and a rough milling pattern (Rotex). This multi-layered texture ensures that no matter how small the shot or how wet the conditions, there is always some form of groove technology engaging with the ball to maximize friction and spin control.

As this image demonstrates, the intricate network of grooves and textures acts like a tread pattern on a tire, creating pathways for water to escape and allowing the face to make clean, firm contact with the ball. This contact point precision is what separates a modern wedge from its predecessors and gives the player consistent spin from any lie.
Thump the Turf: How to Use Bounce to Prevent Digging on Pitches?
For any golfer who has ever chunked a pitch shot, the concept of “bounce” is the antidote. Bounce is the angle created by the leading edge and the lowest point of the sole of the wedge. A higher bounce angle (e.g., 12-14 degrees) means the trailing edge of the sole sits significantly lower than the leading edge. This design feature is engineered to make the club “bounce” or “skid” through the turf and sand, rather than allowing the sharp leading edge to dig in. For players who take deep divots or play on soft courses, a high-bounce wedge is a game-changer.
Conversely, a low bounce angle (e.g., 4-8 degrees) is better suited for firm turf, tight lies, and players with a sweeping swing who take very shallow divots. The key is to match the bounce of your wedge to your swing type (digger vs. sweeper) and your typical course conditions. The engineering team at Callaway Golf sums it up perfectly: ” High bounce is better for players who take deep divots, while less bounce is great for players who have more of a sweeping swing and smaller divots.”
To learn to use bounce effectively, you must stop trying to “lift” the ball. Instead, trust the club’s design. Set up with your hands only slightly ahead of the ball, maintaining a neutral shaft position. The goal is to feel the sole of the club “thump” the ground at the bottom of your swing. A great drill is to make practice swings focusing on hearing a dull ‘thump’ rather than a sharp ‘slice’ through the grass. This sound is the bounce engaging with the turf. Feel the club “bruise” the grass rather than cutting it. This sensation of the sole gliding through impact is the key to crisp, consistent wedge shots and the end of the dreaded chunk.
Why the High Lob Shot Is a Fatal Mistake on Firm Links Turf?
Playing on firm, fast-running links courses or hardpan conditions requires a completely different short-game strategy than on soft, lush parkland courses. The high, spinning lob shot, which is a go-to weapon on soft greens, becomes a high-risk, low-reward play on firm turf. The reason lies in the physics of bounce interaction. A high-bounce wedge (10+ degrees) is designed to prevent digging in soft ground. When that same wedge is used on a rock-hard surface, there’s nothing for the sole to dig into. Instead, the wide sole ‘rebounds’ off the hardpan, causing the leading edge to rise up and strike the ball’s equator. The result is the dreaded bladed shot that flies low and fast across the green.
Links specialists universally abandon the aerial game around the greens in favor of the ground game. The bump-and-run is the preferred shot, typically executed with a lower-lofted club like a pitching wedge or even an 8-iron. Using a simple, putting-style stroke, the goal is to get the ball on the ground as quickly as possible and let it roll out to the hole like a putt. This strategy has two major advantages: it takes the unpredictable bounce of firm turf out of the equation, and it keeps the ball low and under the wind, which is a constant factor on links courses.
Choosing the right shot for the turf condition is paramount. A golfer must become a strategist, assessing the firmness of the ground before even selecting a club. On firm ground, low-bounce wedges (4-8 degrees) are more effective, as they allow the leading edge to get under the ball without the sole rebounding. However, the safest play is often to put the high-lofted wedges away altogether and embrace the low-running shot. This isn’t a compromise; it’s smart, percentage-based golf.
Key takeaways
- Your wedge’s bounce and grind are more important than its loft for achieving consistent contact.
- Match your bounce to your swing type and course conditions: high bounce for diggers and soft turf, low bounce for sweepers and firm turf.
- Use a grind that matches your shot-making style: S-Grind for consistency, C-Grind for versatility and open-faced shots.
One Wedge, Three Shots: How to Manipulate Trajectory Around the Green?
Once you have selected the right wedge with the appropriate bounce and grind, the next level of mastery is learning to hit multiple shots with that single club. A versatile short-game player doesn’t need three different wedges for three different shots around the green; they need one wedge and the knowledge of how to manipulate ball position, clubface angle, and shaft lean to control trajectory. A 54 or 56-degree sand wedge can be used to hit a low, running chip, a mid-height pitch, or a high, soft-landing shot with simple setup adjustments.
The key to trajectory control is understanding the relationship between ball position and shaft lean. This is the foundation of shot-making versatility. A simple framework is to think of hitting three distinct shots: low, medium, and high.
This table from GOLFTEC provides a clear guide on how ball position affects the shot:
| Ball Position | Shaft Lean | Trajectory | Spin Rate | Best Use |
|---|---|---|---|---|
| Front of stance | Minimal forward | High | Maximum | Over obstacles, soft landing |
| Middle of stance | Neutral | Medium | Moderate | Standard approach |
| Back of stance | Forward press | Low | Reduced | Into wind, maximum roll |
| Open stance/face | Behind ball | Extra high | High | Flop shots |
To control distance with these shots, players can use the “Clock System.” Imagine your backswing as the hands of a clock. A short backswing to 7 o’clock might produce a 30-yard shot, a swing to 9 o’clock a 70-yard shot, and a swing to 10 o’clock an 85-yard shot. The key is to maintain the same smooth tempo for every swing length, letting the length of the backswing dictate the distance, not the effort. By combining a ball position adjustment for trajectory with a backswing length adjustment for distance, you can unlock a huge variety of shots from your single, trusted wedge.

As the visual demonstrates, a single club in the hands of a knowledgeable player is a powerful and versatile tool. True short-game artistry isn’t about having a bag full of specialized clubs; it’s about knowing how to get the most out of the one you have.
Now that you understand the intricate relationship between loft, bounce, grind, and face technology, the next step is to apply this knowledge. Don’t just buy a wedge off the rack; go to a practice facility or a professional fitter and test different options. Feel how a high-bounce wedge glides through the grass and how a C-grind lets you open the face with ease. Transforming your short game starts with turning this theoretical knowledge into practical, on-course confidence.